Reinforcement labeling

Reinforcement labels are represented with the ReinforcementLabel objects. A label consists of the label text and (optionally) the leader (shown in blue on the image to the right). The leader can also have an end symbol.
There are four main types of the reinforcement label, shown in the table below. All the types (also the variations of the main types) are represented in the LabelTypes class.
| Label type | Scheme |
|---|---|
| Label with pointer | |
| Label with fan | 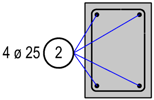 |
| Label with comb | 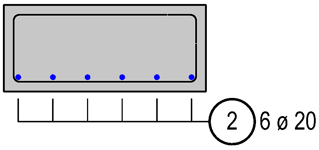 |
| Label with dimension line | 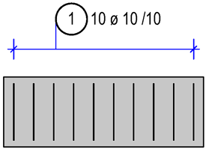 |
A ReinforcementLabel is associated with a BarPlacement and a UVS. This is done with the SetLabel method of the BarPlacement. Association means in this case: when the bar placement OR the UVS gets deleted, the associated label gets deleted as well.
- The association with an associative view is done with an AssocViewElementAdapter
Class diagram
classDiagram
direction BT

class AssocViewElementAdapter
class BarPlacement {
    SetLabel()
}
class ReinforcementLabel {
    SetVisibleBars()
    SetAdditionalText()
    SetTextProperties()

    bool ShowTextPointer
    bool ShowTextPointerEndSymbol
}
class LabelType{
    <<Enumeration>>
    LabelWithComb
    LabelWithDimensionLine
    LabelWithFan
    LabelWithPointer
}
class ReinforcementLabelProperties{
    bool ShowPositionNumber
    bool ShowBarDiameter
    bool ShowBarDistance
    bool ShowBarCount
    bool ShowSteelGrade
}
class TextProperties{
    eTextAlignment Alignment
    int BackgroundColor
    int Font
}

ReinforcementLabel "*" --o BarPlacement
ReinforcementLabel ..> AssocViewElementAdapter: associated
LabelType "1" --o ReinforcementLabel
ReinforcementLabelProperties "1" --o ReinforcementLabel
TextProperties "1" --o ReinforcementLabel
Info
ReinforcementLabel cannot be used with other type of placements like CircularAreaElement or ExtrudeBarPlacement. It is suitable for linear placement only!
ReinforcementLabel should not be confused with LabelElement, which represents general label texts in Allplan, whereas ReinforcementLabel is an object dedicated for reinforcement.
Label with pointer
Labeling a rebar with a label with pointer is particularly recommended on the UVS, where the rebar shape is displayed in its real dimensions (view direction is perpendicular to the rebar plane). This type of label consists of the label text and one leader. The latter is optional.
What should be displayed in the label text, is defined in the ReinforcementLabelProperties. How the label text should look like, is defined in the TextProperties. We need both objects in the first place:
label_properties                    = AllplanReinf.ReinforcementLabelProperties()
label_properties.ShowPositionNumber = True
label_properties.ShowBarDiameter    = True
label_properties.ShowBarDistance    = False
...

text_properties                 = AllplanBasisElements.TextProperties()
text_properties.Alignment       = AllplanBasisElements.TextAlignment.eRightMiddle
The ReinforcementLabel can be now constructed in two ways:
In this case we provide the placement point of the label as a Point2D in the global coordinate system
label_point = AllplanGeo.Point2D(...)

label = AllplanReinf.ReinforcementLabel(
    reinforcementType = AllplanReinf.Bar,
    type              = AllplanReinf.LabelType.LabelWithPointer,
    positionNumber    = 1,
    labelProp         = label_properties,
    labelPoint        = label_point, #(1)!
    angle             = AllplanGeo.Angle.())
-
The reference point will vary, depending in the Alignment set in
text_properties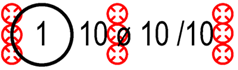
In this case we provide an offset as Vector2D from a point located on the specified leg of the rebar being labeled.
label_offset = AllplanGeo.Vector2D(-200, 0)

label = AllplanReinf.ReinforcementLabel(
    reinforcementType = AllplanReinf.ReinforcementType.Bar,
    type              = AllplanReinf.LabelType.LabelWithPointer,
    positionNumber    = 1,
    labelProp         = label_properties,
    shapeSide         = 3,
    shapeSideFactor   = 0.5,        #(1)!
    labelOffset       = label_offset,
    angle             = AllplanGeo.Angle.FromDeg(build_ele.Angle.value))
-
The label will be created by the 3rd leg (
shapeSideset to 3). Leg numerations starts with 1 and hooks are considered as legs.The
shapeSideFactorset to 0.5 means, that the offset is calculated from the middle of the leg (indicated by the red point on the image). According to the vector inlabel_offset, the label will be created 200mm to the left from this point (the offset vector is indicated by the blue arrow on the image).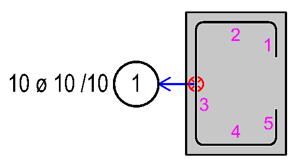
Now, the ReinforcementLabel is created, it is the right moment to apply the TextProperties to it and (if needed) set some additional properties of it, like whether we want the leader end symbol to be displayed or not:
label.SetTextProperties(text_props)
label.SetShowTextPointer(True)
label.SetShowTextPointerEndSymbol(True)
In the last step we associate the label with a placement and a UVS.
Example
The full implementation is shown in the example LabelWithPointer, located in:
- …\etc\Examples\PythonParts\ReinforcementExamples\Labels\LabelWithPointer.pyp
- …\etc\PythonPartsExampleScripts\ReinforcementExamples\Labels\LabelWithPointer.py
Label with dimension line
Labeling a rebar with a label with dimension line is recommended for linear placements shown on UVS, where the placement line is displayed in its real dimension. In other words: the view direction is perpendicular to the placement line.
Failure
Do not create this kind of label in a UVS, which view direction is parallel to the placement line, as this will create damaged data in the DF!
Abstract
Regarding ReinforcementLabelProperties and
TextProperties, the same rules applies, as they do for
label with a pointer. We created these objects in the paragraph above
as label_props and text_props and will refer to them in this paragraph.
Let's construct the ReinforcementLabel object:
label = AllplanReinf.ReinforcementLabel(
    reinforcementType    = AllplanReinf.Bar,
    type                 = AllplanReinf.LabelWithDimensionLine,
    positionNumber       = 1,
    labelProp            = label_props,
    bDimLineAtShapeStart = False, #(1)!
    dimLineOffset        = 200)  #(2)!
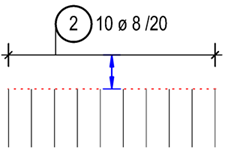
- Assuming the placement line goes in X+ direction, setting this argument to False will create the dimension line above the placement.
-
This is the distance between the placement line and the dimension line:
Now we can set some additional properties relevant for the label with dimension line. They are all optional and may have no influence on other types of labels:
label.SetVisibleBars([-1, 0, 1]) #(1)!
label.SetLabelOffset(AllplanGeo.Vector2D(0,200)) #(2)!
label.SetTextProperties(text_props)
label.ShowAllBars(True) #(3)!
- This will result in only the first, last and the middle rebar being displayed.
- The label can be moved away from its initial position by a vector. However, this not always have an impact: see info box below.
-
Setting this to True will show all rebar markers on the dimension line.
Info

Setting the TextProperties.Alignment
in the text_props object to eLeftMiddle
or eRightMiddle results in the Label being
placed at the end or start of the dimension line respectively, as shown on the image above. In this case,
the method SetLabelOffset will have
no influence on the position of the label in relation to the dimension line
The last step is, as in the label with pointer the association of the label with a bar placement and a UVS.
Example
The full implementation is shown in the example LabelWithDimensionLine, located in:
- …\etc\Examples\PythonParts\ReinforcementExamples\Labels\LabelWithDimensionLine.pyp
- …\etc\PythonPartsExampleScripts\ReinforcementExamples\Labels\LabelWithDimensionLine.py
Label with fan
Label with a fan is recommended when labeling multiple rebars in a UVS. This kind of label is very similar to the label with pointer. However, unlike label with pointer:
- multiple leaders (a fan of leaders) to each displayed rebar are generated instead of just single one
- it is possible to place the label only by a point in global coordinate system, and not by an offset to a rebar leg
Abstract
Regarding ReinforcementLabelProperties and
TextProperties, the same rules applies, as they do for
label with a pointer. We created these objects in this paragraph
as label_props and text_props and will refer to them here as well.
The construction of the ReinforcementLabel looks
exactly the same, as the construction of a label with pointer object,
but with the type set to LabelWithFan:
label_point = AllplanGeo.Point2D(...)

label = AllplanReinf.ReinforcementLabel(
    reinforcementType = AllplanReinf.Bar,
    type              = AllplanReinf.LabelType.LabelWithFan,
    positionNumber    = 1,
    labelProp         = label_properties,
    labelPoint        = label_point, #(1)!
    angle             = AllplanGeo.Angle.())
-
The reference point will vary, depending in the Alignment set in
text_properties
The next steps to be introduced after the label creation are exactly the same, as in case of label with pointer.
Example
The full implementation is shown in the example LabelWithFan, located in:
- …\etc\Examples\PythonParts\ReinforcementExamples\Labels\LabelWithFan.pyp
- …\etc\PythonPartsExampleScripts\ReinforcementExamples\Labels\LabelWithFan.py
Label with a comb
Label with a comb is recommended, when labeling longitudinal bars, which are visible in a UVS as points. It is a mixture of a fan and a dimension line:
- like the fan, it has multiple leaders
- like the dimension line, it is placed by offset to the placement line
Failure
Do not create this kind of label in a UVS, which view direction is parallel to the placement line, as this will create damaged data in the DF!
Before constructing a label with comb, we firstly need to define properties of the comb line. These properties are represented by the ReinforcementLabelPointerProperties object and include information like:
- angle of the comb teeth
- length of the tines
comb_props = AllplanReinf.ReinforcementLabelPointerProperties(
    combLineAngle     = 90,
    bCombLineByLength = True, #(1)!
    combLineValue     = 5) #(2)!
- When set to True, the comb tines will have a fixed length, defined in
combLineValue. Otherwise, thecombLineValuewill be the distance between labeled rebar and the tip of the comb tine - This length/distance is given in millimeter on a print layout! It will therefore vary depending on the scale set in DF.
Abstract
Regarding ReinforcementLabelProperties
and TextProperties, the same rules applies, as they
do for label with a pointer. We created these objects in this paragraph
as label_props and text_props and will refer to them here as well.
To construct the ReinforcementLabel object we use a constructor similar to the one we used when creating a label with dimension line, but with an extra argument for the comb line properties:
label = AllplanReinf.ReinforcementLabel(
    reinforcementType    = AllplanReinf.Bar,
    type                 = AllplanReinf.LabelType.LabelWithComb, #(1)
    positionNumber       = 1,
    labelProp            = label_props,
    pointerProp          = comb_props,
    bDimLineAtShapeStart = True,
    dimLineOffset        = 200)
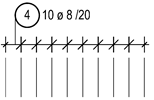
- This will create a comb with a number of tines equal to the number of labeled rebars. Alternatively, we can create a comb pointing only the first and last two or three rebars. See the documentation of the class LabelType to see all possible options.
Now, next optional step will be to set additional properties of the label object, such as
additional text(SetAdditionalText)
or visible bars (SetVisibleBars).
This is done exactly the same way, as it is done with the label with dimension line.
The last step is, as in all previous examples, associating the label with a bar placement and a UVS:
Example
The full implementation is shown in the example LabelWithComb, located in:
- …\etc\Examples\PythonParts\ReinforcementExamples\Labels\LabelWithComb.pyp
- …\etc\PythonPartsExampleScripts\ReinforcementExamples\Labels\LabelWithComb.py