Selection
Abstract
-
There are two types of selection:
-
The implementation of any kind of element selection differs significantly depending on whether you are building an interactor or a script object PythonPart. Select the right tab, when exploring this article.
-
In both cases, you can set up a filter to allow only specific elements for selection
-
Introducing element selection in a standard PythonPart is not possible.
Single selection
Follow these implementation steps, when you want to introduce an input step of picking one element from the model:
Use classes of the SingleElementSelectInteractor
module in your script object class
as follows:
-
Define instance attribute for saving the selection results. Is should be a
SingleElementSelectResult. Do it in the constructor, like: -
Optionally set up a filter (learn more below )
-
Initialize the selection by creating an instance of
SingleElementSelectInteractorand assigning it to thescript_object_interactorproperty of your script object class. Depending on when you want the selection to be started, implement it in an appropriate method (learn more here). In this example, the selection starts right after the PythonPart is started, so the right place is thestart_input()method.def start_input(self): self.script_object_interactor = SingleElementSelectInteractor( self.selection_result, selection_filter, # (1)! prompt_msg = "Select the element" #(2)! )- If you have set up a filter in step 2, apply it here.
- Provide a meaningful prompt to the user for a better UX. It will be shown in the dialog line, where such instructions are expected to appear.
-
Terminate the input by removing the reference to the
SingleElementSelectInteractorfrom thescript_object_interactorproperty. This needs to be done in thestart_next_input()
To access the selected element, read the property sel_element of the result data class.
To access the geometry of the selected element, read the property sel_geo_ele:
-
Optionally set up a filter. Learn more below .
-
Initialize the selection. Do it at the beginning, in the constructor.
Call
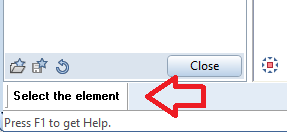
InitFirstElementInput()like:def __init__(...): ... prompt_msg = AllplanIFW.InputStringConvert("Select the element") #(2)! self.coord_input.InitFirstElementInput(prompt_msg) self.coord_input.SetElementFilter(sel_filter) #(1)!- If you've defined a filter in step 1, apply it here
- Provide a meaningful message to the user. Something better than this example.
This shows the prompt message in the dialog line. It looks like this:
Call
InitFirstElementValueInput()like:def __init__(...): ... prompt_msg = AllplanIFW.InputStringConvert("Select the element or input value:") #(3)! input_control = AllplanIFW.ValueInputControlData( AllplanIFW.eValueInputControlType.eANGLE_COMBOBOX, #(1)! bSetFocus = False, bDisableCoord = False ) self.coord_input.InitFirstElementValueInput(prompt_msg, input_control) self.coord_input.SetElementFilter(sel_filter) #(2)!- See eValueInputControlType for available types of the input field.
- If you've defined a filter in step 1, apply it here.
- Provide a meaningful message to the user. Something better than this example.
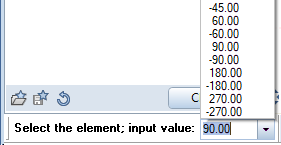
This shows the prompt message and an input field in the dialog line. You can call
GetInputControlValue()any time in the script to retrieve this valueTip
Any change in this input field triggers the
on_preview_draw()event. Pressing Enter triggers theon_value_input_control_enter()event.At this stage, you can call other functions affecting the way, how the selection is done. You can e.g., allow selecting elements in the wizard window:
-
Perform element search. You can either search for an element or for a geometry. Your choice will impact the UX (the highlighting behavior is a bit different, see GIFs below), but it won't impact the result of the selection. Regardless, which one you choose, implement it in
process_mouse_msg()event:To search for an element, call
SelectElement():def process_mouse_msg(self, mouse_msg, pnt, msg_info): ... found = self.coord_input.SelectElement( mouse_msg, pnt, msg_info, bHighlight = True, bSelAlways = False, bAllowCenter = False )
In this case, the entire element is highlighted when hovered. Additionally, the info box appears at the cross hair. From UX point of view, this kind of search is recommended, when the input is about selecting an element as a whole: geometry and its meta-data (attributes).
To search for a geometry, call
SelectGeometryElement().def process_mouse_msg(self, mouse_msg, pnt, msg_info): ... found = self.coord_input.SelectGeometryElement( mouse_msg, pnt, msg_info, bHIghlightCompleteElement = False #(1)! )- By default, only the selected geometry is highlighted. Optionally, the entire element can be highlighted.
In this case, the element is found, when the user hovers over the edges of the element, but not the inside of the element. The difference is clearly visible in case of architecture elements in the ground view. This kind of search is recommended, when the input is about selecting pure geometry of the element (e.g. you want to get a vertex, edge or face of an element) and not its meta-data.
-
Retrieve the selected element by calling
GetSelectedElement()Implement it directly after step 3, but only when the mouse was clicked and an element was found. For example like this:
def process_mouse_msg(self, mouse_msg, pnt, msg_info):
    ...
    found = self.coord_input.SelectElement(...)

    if self.coord_input.IsMouseMove(mouse_msg) or not found:
        return True

    selected_element = self.coord_input.GetSelectedElement()
The
selected_elementnow contains aBaseElementAdapter, which you can use for further processing. To learn more, what exactly is an adapter, refer to this article.Alternatively or additionally, you can call
GetSelectedGeometryElement()to get the geometry of the element: -
If the next action should be a selection of another element, reinitialize the selection with
InitNextElementInput(). This ensures, that the next element will be searched in the same document, where the first selection was done. Implementation looks the same, as described in the first step.Warning
Remember to always reinitialize the input at this point! Not doing so, may lead to an unexpected behavior or even a crash.
Example
Here is the full code of a simple implementation of single element selection. After an element is selected, some action is introduced and the selection is restarted. No filter is applied for the selection, so there is no step 1.
class MyInteractor(BaseInteractor):

    def __init__(self, coord_input, ...):

        self.coord_input = coord_input

        # step 2 - initialize selection
        prompt_msg = AllplanIFW.InputStringConvert("Select the element")
        self.coord_input.InitFirstElementInput(prompt_msg)
        self.coord_input.SetElementFilter(sel_filter)
    ...
    def process_mouse_msg(self, mouse_msg, pnt, msg_info):
        # step 3 - element search
        found = self.coord_input.SelectElement(
            mouse_msg, pnt, msg_info,
            True, True, True
        )

        if self.coord_input.IsMouseMove(mouse_msg) or not found:
            return True

        # step 4 - retrieving the element
        selected_element = self.coord_input.GetSelectedElement()

        # introducing some actions
        print(selected_element)

        # step 5 - reinitialize
        prompt_msg = AllplanIFW.InputStringConvert("Select next element")
        self.coord_input.InitFirstElementInput(prompt_msg)

        return True
Multiple selection
To introduce an input step, in which the user can select multiple model elements, e.g. by drawing a rectangle or by using the bracket or fence functionality (activated by right mouse click during the selection), follow these implementation steps:
Use classes of the MultiElementSelectInteractor
module in your script object class
as follows:
-
Define instance attribute for saving the selection results. It should be a
MultiElementSelectInteractorResult. Do it in the constructor, like: -
Optionally set up a filter (learn more below )
-
Initialize the selection by creating an instance of
MultiElementSelectInteractorand assigning it to thescript_object_interactorproperty of your script object class. Depending on when you want the selection to be started, implement it in an appropriate method (learn more here). In this example, the selection starts right after the PythonPart is started, so the right place is thestart_input()method.def start_input(self): self.script_object_interactor = MultiElementSelectInteractor( self.selection_result, selection_filter, # (1)! prompt_msg = "Select the elements" #(2)! )- If you have set up a filter in step 2, apply it here.
- Provide a meaningful prompt to the user for a better UX. It will be shown in the dialog line, where such instructions are expected to appear.
-
Terminate the input by removing the reference to the
MultiElementSelectInteractorfrom thescript_object_interactorproperty. This needs to be done in thestart_next_input()
To access the selected elements, read the property
sel_elements
of the result data class.
-
At the beginning of the script flow, in the constructor of your interactor:
- define instance attribute for saving the selection results. Use dedicated
class
PostElementSelection. - Set up a filter (learn more below ). If you don't want to filter anything, create an empty filter, as shown below.
def __init__(self, coord_input, ...):
    self.coord_input = coord_input
    self.post_element_selection = AllplanIFW.PostElementSelection()
    self.selection_filter = AllplanIFW.ElementSelectFilterSetting()
Warning
During the selection, the user can define his own filter using ALLPLAN filtering functionality. If he does so, it will overwrite your filter! Therefore, you must take into account a case, in which the final list of selected elements contains elements, that you wouldn't expect there!
- define instance attribute for saving the selection results. Use dedicated
class
-
Start the selection by calling
InputFunctionStarter.StartElementSelect()In this example, the selection is started when the PythonPart is started, so the call is done in the constructor. Your implementation might be different:def __init__(self, coord_input, ...): ... AllplanIFW.InputFunctionStarter.StartElementSelect( "Select elements", #(1)! self.selection_filter, self.post_element_selection, markSelectedElements = True )- This is the user prompt, that will be shown in the dialog line, when the selection is started. Provide a meaningful message to your users for a good UX.
Info
After this call, the
process_mouse_msgevent is overloaded. Whatever you've implemented there, it's not executed until the selection is completed!Failure
Make sure not to start a selection function, when one is already running! This will lead to a crash!
To restart an already running selection function, call the RemoveFunction first and then start a new one. Bare in mind, that calling RemoveFunction when no selection function is running also leads to a crash!
-
Retrieve the selected elements by calling
GetSelectedElements()on the result class. Do it in theprocess_mouse_msg()event:def process_mouse_msg(self, mouse_msg, pnt, msg_info): document = self.coord_input.GetInputViewDocument() elements = self.post_element_selection.GetSelectedElements(document)As mentioned earlier,
process_mouse_msg()is overloaded during the selection and called only after it's completed. But a selection is completed also, when the user has drawn a rectangle and nothing was in it. It is therefore recommended to restart the selection, when the list of selected elements is empty:
Example
Here is a simple implementation of a workflow consisting of a selection of multiple elements. After at least one element is selected, an action is introduced and the selection is restarted.
class MyInteractor(BaseInteractor):

    def __init__(self, coord_input, ...):

        # step 1 - preparing attributes
        self.post_element_selection = AllplanIFW.PostElementSelection()
        self.sel_filter             = AllplanIFW.ElementSelectFilterSetting()
        self.coord_input            = coord_input

        # step 2 - start the selection
        self.start_selection()

    def process_mouse_msg(self, mouse_msg, pnt, msg_info):

        # step 3 - retrieve the selected elements
        document = self.coord_input.GetInputViewDocument()
        elements = self.post_element_selection.GetSelectedElements(document)

        if len(elements) == 0:  #(2)!
            self.start_selection()
            return True

        # introduce some action
        print(elements)

        self.start_selection()
        return True

    def start_selection(self):
        AllplanIFW.InputFunctionStarter.StartElementSelect(
            "Select elements",
            self.sel_filter,
            self.post_element_selection,
            markSelectedElements = True
        )
Face selection
To search for a face of a polyhedron, modify the 4th step from this list. First, getting the element must be performed with every mouse movement in order to correctly highlight the face. Directly after the element adapter is retrieved with GetSelectedElement method, call the SelectPolyhedronFace.
selected_element = self.coord_input.GetSelectedElement()

if polyhedron_ele.IsNull():
    return True

is_selected, face_polygon, intersect_result = \
    AllplanBaseEle.FaceSelectService.SelectPolyhedronFace(
        selected_element,
        pnt,
        True, #(1)!
        self.coord_input.GetViewWorldProjection(),
        self.coord_input.GetInputViewDocument(),
        False) #(2)!
- This option will highlight the selected face
- If you want to allow the face selection in a UVS, set this to True. If you want to allow the selection only in a UVS, use a dedicated method SelectPolyhedronFaceInUVS
As a result, you will get three elements:
- a boolean value indicating that a face was successfully selected
- a Polygon3D representing the selected face
- an IntersectRayPolyhedron containing information such as normal vector of the selected face or the point on the face that was clicked.
Example on GitHub
See the complete implementation in the example PolyhedronFaceSelection ( PYP | PY).
Tip
For selection of a wall face, we recommend to use a dedicated method SelectWallFace. It is similar to one for selecting polyhedron faces, but snoops only to walls. It also guarantees that the face is always an outer face of the wall. Refer to the example WallFaceSelection to see the full implementation.
Setting up a filter
In general, filtering the elements for selection may be done by defining:
- a list of allowed element types - very simple, but also not very flexible way of filtering
- a callable with one argument being the
BaseElementAdapterand a boolean return value, saying whether this element adapter is valid for selection (True) or not (False) - more complicated, but way more flexible way of defining a filter
Each element type (beam, wall, rebar) is identified by a unique GUID.
You can refer to these GUIDs using meaningful aliases defined as attributes in the
NemAll_Python_IFW_ElementAdapter module. All the aliases end with ...TypeUUID, so its
easy to recognize them.
Example
To filter only columns and beams, define a list like:
Tip
The element types have nothing to do with Python classes. It may happen, that two different python objects of the same class represent two elements with different Type_UUIDs in the DF. An example of that is ModelElement3D:
- when the geometry object used to construct it was a polyhedron
the resulting element will be of type
Volume3D_TypeUUID - when the geometry object used to construct it was a brep
the resulting element will be of type
BRep3D_Volume_TypeUUID
You can check the type of the element by calling GetElementAdapterType.GetTypeName on the element adapter
You can define a callable, that takes exactly one argument of type
BaseElementAdapter and returns
True when the element is valid for selection, False when not. This can be a simple function
or a class with __call__() method.
Example
You can define a filter as an anonymous lambda function. The following one allows only elements with a geometry being a polyhedron:
For more complex conditions, you can define a filter with a function. The following one allows only elements with a geometry being a polyhedron, but with exactly 6 faces:
def has_six_faces(element: AllplanElementAdapter.BaseElementAdapter) -> bool:
    if not isinstance(geo := element.GetModelGeometry(), AllplanGeometry.Polyhedron3D):
        return False
    return geo.GetFacesCount() == 6
For even more flexibility, you can define a class with a __call__() member. The following
one allows you to define, how many faces should be valid for selection:
class PolyhedronFacesFilter(BaseFilterObject):  #(1)!
    def __init__(self, number_of_faces: int):
        self.number_of_faces = number_of_faces

    def __call__(self, element: AllplanElementAdapter.BaseElementAdapter) -> bool:
        if not isinstance(geo := element.GetModelGeometry(), AllplanGeometry.Polyhedron3D):
            return False
        return geo.GetFacesCount() == self.number_of_faces

has_seven_faces = PolyhedronFacesFilter(7)
- You can use the BaseFilterObject as a base class to make sure, your implementation is valid.
Tip
PythonParts framework offers some predefined filters, e.g. for filtering out 2D/3D curves only. Have a look at the [ElementFilter][Utils.ElementFilter] module - you might find a filter suiting your use-case there and avoid reinventing the wheel.
Combining filters
You can combine multiple filters with OR operator using
[FilterCollection][Utils.ElementFilter.FilterCollection.FilterCollection]. For example, to allow
beams, columns or any other element with a geometry being a polyhedron with 6 faces, define
the filter as follows:
from Utils.ElementFilter.FilterCollection import FilterCollection
...
complex_filter = FilterCollection()
query_types = [AllplanIFW.QueryTypeID(ele_type) for ele_type in allowed_types]
complex_filter.append(AllplanIFW.SelectionQuery(query_types))
complex_filter.append(has_six_faces)
Applying the filter
In a script object, you apply the filter when creating the selection interactor. The good news: you can use the list of allowed element types, callable or a filter collection directly:
def start_input(self):
    self.script_object_interactor = SingleElementSelectInteractor(
        self.selection_result,
        ele_filter = allowed_types, # (1)!
        prompt_msg = "Select the element"
    )
-
You can also provide the anonymous lambda function:
or the function
has_six_facesor a callable instancehas_seven_faces, like:
In an interactor, the selection filter
must be an ElementSelectFilterSetting.
This object has three components:
Component of ElementSelectFilterSetting |
Description |
|---|---|
| eDocumentSnoopType | In which DF to search for elements for (active, passive, both) |
| eLayerSnoopType | In which layer to search for elements for (active, passive, both) |
| SelectionQuery | Objects valid for selection |
classDiagram
    direction BT

    class ElementSelectFilterSetting
    class eDocumentSnoopType{
        <<Enumeration>>
        eSnoopActiveDocuments
        eSnoopPassiveDocuments
        eSnoopAllDocuments
    }
    class eLayerSnoopType{
        <<Enumeration>>
        eSnoopActiveLayers
        eSnoopPassiveLayers
        eSnoopAllLayers
    }
    class SelectionQuery{
        \_\_init\_\_(list[QueryTypeID | CustomFilter] query)
    }

    class MyFilter

    class BaseFilterObject{
        <<Abstract>>
        \_\_call\_\_(BaseElementAdapter)
    }

    BaseFilterObject --* SelectionQuery
    MyFilter --|> BaseFilterObject
    SelectionQuery --* "1" ElementSelectFilterSetting
    eDocumentSnoopType --* "1" ElementSelectFilterSetting
    eLayerSnoopType --* "1" ElementSelectFilterSetting
If your filter is a list of allowed element types, you need to:
- convert it to a list of
QueryTypeID - create a
SelectionQueryobject - use it to create the
ElementSelectFilterSetting
query_types = [AllplanIFW.QueryTypeID(ele_type) for ele_type in allowed_types]
selection_query = AllplanIFW.SelectionQuery(query_types)
selection_filter = AllplanIFW.ElementSelectFilterSetting(
    selection_query,
    eDocumentSnoopType.eSnoopActiveDocuments,
    eLayerSnoopType.eSnoopActiveLayers
)
If your filter is a callable or a filter collection, you need to :
- convert it to SelectionQuery
- use it to create the ElementSelectFilterSetting