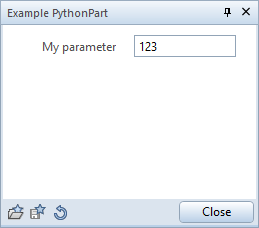
Property palette
A PythonPart (in the meaning of an ALLPLAN extension) is characterized by its parameters. A parameter itself (type, name, etc.) is defined by the developer, but its value is input by the user in the property palette: part of the ALLPLAN UI.
Info
Property palette is the key feature of the PythonParts framework, because it removes the burden of building the UI1 from the developer. It's enough to define the parameters in the PYP file - the framework will take care of showing the right control in the property palette.
Page node
The parameters are defined and grouped in <Page> nodes. This node represents the tabs
shown on the right side of the property palette. This helps to group the parameters into
meaningful sections. The node is defined as follows:
<?xml version =”1.0” encoding =”utf-8”?>
<Element>
    <Script>
    ... <!--(1)! -->
    </Script>

    <Page>
        <Name>FirstPage</Name>
        <Text>First page</Text>
        <TextId>1001</TextId>
        <Visible>True</Visible>
        <Enable>True</Enable>

        <Parameter>
        ... <!--(2)! -->
        </Parameter>
    </Page>

    <Page>
    ... <!--(3)! -->
    </Page>
    ...
</Element>
-
The tag for basic meta-data of a PythonPart. Refer to the previous article about PYP file to learn, what must be put in here.
-
The definition of the parameter.
-

Defining more than one
<Page>will result in a tab control like this to appear.If there is only one page defined, but without any
<Parameter>, an empty palette is shown.If there are more than one
<Page>nodes, but some of them have no<Parameter>, the tabs of the empty ones are not shown at all.
| Tag | Required | Default | Description |
|---|---|---|---|
<Name> |
required | None |
Name of the page. You can refer to it in the script e.g., to handle an event of switching a page |
<Text> |
required | None |
Text displayed on the tab. |
<TextId> |
optional | None |
ID of the translated string resource to localize the <Text> |
<Visible> |
optional | True |
Condition for showing or hiding the entire page. Refer to this article to learn, how a condition can be defined. |
<Enable> |
optional | True |
Condition for disabling/enabling all the controls on the page. |
Tip
The event of user switching the page can be handled using set_active_palette_page function.
Learn more here.
Hidden page
A special page, univisible to the user, can be created with the name __HiddenPage__.
All parameters added to this page are hidden and can be used to add extra parameters unvisible for the user, but accessible in the script. Use cases for such parameter are e.g.:
- object UUIDs for selected elements, which are used to retrieve the new element data in the PythonPart modification
- geometry values, needed for the PythonPart modification
- Attributes, which are set in the PY file
Parameters
The node <Parameter> is used to define the parameter of the PythonPart,as well as the layout and controls
of the property palette. The order of the <Parameter> nodes within the <Page> determines the order of the
controls on the property palette. Here is a basic example of a parameter:
<Parameter>
    <Name>MyParameter</Name>
    <Text>My parameter</Text>
    <Value>123</Value>
    <ValueType>Integer</ValueType><!--(1)!-->
</Parameter>
- The
<ValueType>determines, what type of control will be shown in the palette. Refer to the subchapters to learn, what value types are possible.
For the full list of tags, which can be included under <Parameter> with their explanation please refer
to the chapter all tags.
Refer to a parameter
For each parameter, an object of type ParameterProperty
is being created and added to the BuildingElement object
as an instance attribute. The name of the attribute equals the name of the parameter defined
in the <Name> tag.
BuildingElement is passed as an argument to various functions of the script (learn more about them here or here).
Example
Let's assume we defined a parameter MyParameter in the PYP file, as shown above. When a PythonPart is started, the BuildingElement is constructed by the framework and passed, e.g. to create_element function. You can then access the value of this parameter inside this function like:
def create_element(build_ele: BuildingElement, #(1)!
                   doc: AllplanElementAdapter.DocumentAdapter):

    my_parameter = build_ele.MyParameter.value #(2)!
    print("The value of MyParameter is: " + str(my_parameter))
- The BuildingElement object has the MyParameter in an
instance attribute named the same as the parameter, so calling
build_ele.MyParameterwill get you ParameterProperty object. - To get the value, refer to the value attribute of the ParameterProperty object
Localize parameter
The texts in the property palette can be localized by providing string resource IDs in an appropriate tag. The table below shows, which tag is to be used for this purpose. To learn more about localizing your PythonPart, refer to this article
| Tag to localize | Tag to use for localization IDs |
|---|---|
<Text> |
<TextId> |
<Value> |
<ValueTextId> |
<ValueTextList> |
<ValueTextIdList> |
Tip
In addition to your own predefined IDs, you can also use standard IDs defined internally in ALLPLAN. To do this, instead of an integer, provide an option from a dedicated enumeration class. They are available in the AllplanSettings module. Their names begin with TextRes. E.g. TextResSillType contains IDs pointing to texts about window sill types available in ALLPLAN.
The same parameter on multiple pages
You can define multiple <Parameter> with the same <Name> in the PYP file, and they will
be considered as the same parameter by the PythonParts framework. Meaning, that changing
the value of one of them, will change the value of the other one. Both can appear on multiple pages
of the property palette.
Example on GitHub
An example of using a parameter on multiple pages is shown in the example AllControls ( PYP | PY)
Styling
Set up the size
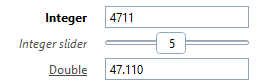
If a control is in a row, the height and width can be defined by the optional tags <HeightInRow> and <WidthInRow>.
The values must be provided in pixels. The size values can be used, for example, to make the image in a button control more visible.
Set up the text style
The style of the text displayed on the left side can be controlled with
the tag <FontFaceCode>
<Parameter>
    <Name>Integer</Name>
    <Text>Integer parameter</Text>
    <Value>123</Value>
    <ValueType>Integer</ValueType>
    <FontFaceCode>2</FontFaceCode> <!--(1)!-->
    <FontStyle>1</FontStyle>       <!--(2)!-->
</Parameter>
-
This controls the font style (italic, weight) according to the table below.
<FontStyle>Description 0 normal 1 bold 2 italic 4 underline -
This tag controls the size The default value is 1. The higher the number, the larger the text.
Parameter persistency
Using the optional tag <Persistent> it is possible to control the persistency of
the parameter. This means, whether the parameter should be stored in the favorite file (.pyv file)
and/or in the model in the PythonPart itself.
<Parameter>
    <Name>Integer</Name>
    <Text>Integer parameter</Text>
    <Value>123</Value>
    <ValueType>Integer</ValueType>
    <Persistent>Model</Persistent>
</Parameter>
| Setting | Parameter value is... |
|---|---|
| Model | saved in PythonPart only |
| Favorite | saved in favorite file only |
| ModelAndFavorite | saved in both PythonPart and favorite file |
| No | not saved at all |
Include parameter
Within a .pyp file it is possible to include the parameters of another .pyp file
by using a special parameter with the <ValueType> set to Include. A typical use
case for that can be e.g., to include:
- files with general PythonPart parameter
- files with parameter blocks for indexing
into the current .pyp file. Using Include parameter allows to define these parameters only once. This avoids a lot of typing and simplifies the maintenance of the .pyp file.
Here is a simple example of including parameters from another .pyp file:
<Parameter>
    <Name></Name>
    <Text></Text>
    <Value>std\ParameterIncludes\TextProperties.incpyp</Value><!--(1)!-->
    <ValueType>Include</ValueType>
    <Visible>Alignment:False</Visible><!--(2)!-->
</Parameter>
-
Path to the included file can be defined relatively to the current .pyp file or with a leading std\, etc\, usr\ or prj\ to make it absolute.
Note, that the included file can have any extension. .incpyp is only a recommendation.
-
You can prevent individual parameters from being included by adding the
<Visible>tag like this. separate multiple parameters with|, like this:
Warning
When the PythonPart is moved/copied by the user within the ALLPLAN library the main .pyp file is
moved/copied, but the included files are not. At the same time, the path defined in <Value>
tag remains unchanged. If it is a path relative to .pyp file, it will point to a nonexistent file
after moving the main file.
Tip
In the following folder:
...\Etc\PythonPartsFramework\ParameterIncludes\
you can find .incl files containing sets of parameters for some standard types of elements such as text. These may require a significant number of parameters. So, to save work of defining them, you can refer an .incpyp from this directory.
Info
The old #include directive is soft-deprecated.
Multiple include
It's possible to include a single .incpyp file multiple times at once, like:
<Parameter>
    <Name>Left;2-4;Right</Name><!--(1)!-->
    <Text></Text>
    <TextId>1002;;1003</TextId><!--(2)!-->
    <Value>IncludeParameter.incpyp</Value><!--(3)!-->
    <LanguageFile>IncludeParameter_incpyp</LanguageFile><!--(4)!-->
    <ValueType>Include</ValueType>
</Parameter>
- Indices defined here will be added as suffix to the names of parameters in the included
file. They will also replace the
#placeholder in all existing<Text>tags from the included file. The value can be a string, a single number or an index range like2-4. - If the indices in the
<Name>tag are texts, here you can provide their ID in the string resource file to localize them. For the range2-4we must provide an empty entry. - Path to the included file to include. The path can be relative to the current .pyp file or with a leading std\, usr\ or prj\ to make it globally a standard ALLPLAN path.
- Path to the string resource file of the included file. It can be relative to the current pyp file or with a leading std\, usr\ or prj\ to make it globally a standard ALLPLAN path. It's optional. If not defined, the text for the IDs is taken from the resource file of the pyp file.
Note
The # character will be replaced with an index also inside the <Visible> or <Enable>
tags. If the index is defined as a range, it is possible to define the formula like this:
Example
In this example, the included file contains one parameter Length. Let's include it into the target file.
<Page>
    <Name>FirstPage</Name>
    <Text>Page text 1</Text>
    <TextId>1001</TextId>

    <Parameter>
        <Name>Left;2-4;Right</Name><!--(3)!-->
        <Text></Text>
        <TextId>1002;<!--(2)!-->;1003</TextId>
        <Value>IncludeParameter.incpyp<!--(1)!--></Value>
        <LanguageFile>IncludeParameter_incpyp</LanguageFile>
        <ValueType>Include</ValueType>
    </Parameter>
</Page>
- The file suffix does not have to be .incpyp. Parameter from regular .pyp files can also be included.
- Note, that there is no TextId specified here, as the index is defined as a range!
- With indices defined like this, we will be including the parameter 5 times in total, as: Left, 2, 3, 4, and Right.
<Include>
    <Parameter>
        <Name>Length</Name>
        <Text>Length #<!--(1)!--></Text>
        <TextId>2000</TextId>
        <Value>1000</Value>
        <ValueType>Length</ValueType>
    </Parameter>
</Include>
- The
#placeholder will be replaced with the indices defined in the<Name>tag of the Include parameter in the target file.
<Item>
    <TextId>1002</TextId>
    <Text>links</Text>
</Item>
<Item>
    <TextId>1003</TextId>
    <Text>rechts</Text>
</Item>
<Item>
    <TextId>2000</TextId>
    <Text>Länge #<!--(1)!--></Text>
</Item>
- As the string in the
<Text>tag in the source .pyp file contains the#placeholder, it must also be specified in here.
<Page>
    <Name>FirstPage</Name>
    <Text>Page text 1</Text>
    <TextId>1001</TextId>

    <Parameter>
      <Name>LengthLeft</Name>
      <Text>Länge links</Text>
      <Value>1000</Value>
      <ValueType>Length</ValueType>
    </Parameter>
    <Parameter>
      <Name>Length2</Name>
      <Text>Länge 2</Text>
      <Value>1000</Value>
      <ValueType>Length</ValueType>
    </Parameter>
    <Parameter>
      <Name>Length3</Name>
      <Text>Länge 3</Text>
      <Value>1000</Value>
      <ValueType>Length</ValueType>
    </Parameter>
    <Parameter>
      <Name>Length4</Name>
      <Text>Länge 4</Text>
      <Value>1000</Value>
      <ValueType>Length</ValueType>
    </Parameter>
    <Parameter>
      <Name>LengthRight</Name>
      <Text>Länge rechts</Text>
      <Value>1000</Value>
      <ValueType>Length</ValueType>
    </Parameter>
</Page>
Example on GitHub
The usage of the include parameter is shown in the example IncludeParameter ( PYP | PY).
References to included parameters
If the included file contains parameters, that refer to another parameter in this file
e.g., to control the visibility, we must use the $ placeholder to consider the indices
defined in the <Name> tag of the referred parameter name.
Example
In this example, the included file contains two parameters:
- Height - a length parameter
- ShowHeight - a check box, that should control the visibility of the Height parameter
The target file includes the parameter from the included file two times, with different indices: Wall and Beam
<Parameter>
    <Name>Height</Name>
    <Text># height<!--(2)!--></Text>
    <Value>3000</Value>
    <ValueType>Length</ValueType>
    <Visible>ShowHeight$<!--(1)!--></Visible>
</Parameter>
<Parameter>
    <Name>ShowHeight</Name>
    <Text>Show # height</Text>
    <Value>True</Value>
    <ValueType>Checkbox</ValueType>
</Parameter>
- The
$placeholder is replaced with the stringWallorBeamfrom the<Name>tag of the include parameter, creating a reference to a specific parameter as a result - The
#placeholder is replaced with the stringWallorBeam, creating a specific text in the palette.
<Page>
    <Name>FirstPage</Name>
    <Text>First page</Text>

    <Parameter>
        <Name>HeightWall</Name>
        <Text>Wall height</Text>
        <Value>3000</Value>
        <ValueType>Length</ValueType>
        <Visible>ShowHeightWall<!--(1)!--></Visible>
    </Parameter>

    <Parameter>
        <Name>ShowHeightWall</Name>
        <Text>Show Wall height</Text>
        <Value>True</Value>
        <ValueType>Checkbox</ValueType>
    </Parameter>

    <Parameter>
        <Name>HeightBeam</Name>
        <Text>Beam height</Text>
        <Value>3000</Value>
        <ValueType>Length</ValueType>
        <Visible>ShowHeightBeam<!--(2)!--></Visible>
    </Parameter>

    <Parameter>
        <Name>ShowHeightBeam</Name>
        <Text>Show Beam height</Text>
        <Value>True</Value>
        <ValueType>Checkbox</ValueType>
    </Parameter>

</Page>
- The
$is replaced withWall, creating the correct reference to the ShowHeightWall parameter, ensuring the correct visibility behavior of the control. - The
$is replaced withBeam, creating the correct reference to the ShowHeightBeam parameter, ensuring the correct visibility behavior of the control.
Migrate parameter
When you release a new version of your PythonPart and you renamed, added, or deleted some parameters, the PythonPart elements created with the older version will still contain the old parameters. When a user then reactivates it with double-click, the framework will construct the BuildingElement with parameter names from new PYP file and will try to assign them values from the modified PythonPart element. However, it won't be able to assign values to parameters with changed names, so it will assign the default values from the new PYP file. This may lead to unwanted changes of the PythonPart element and the user will not be aware of them!
To prevent this, the parameter must be migrated by implementing the migrate_parameter() function.
It will be called every time a PythonPart is run in modification mode (e.g., by a double click).
The implementation must be done as follows:
def migrate_parameter(parameter_list: List[str],
                      version       : float):
    """ migrate the parameter

    Args:
        parameter_list: parameter list
        version:        PythonPart version
    """
Version check
The version of the current PythonPart is passed as a float in the argument version. The check,
if the migration is necessary, can be done in the script like this:
Parameter conversion
With the argument parameter_list all the arguments are passed to the function as a list,
where in each entry a parameter is represented with a string (regardless its value type e.g.,
Radius=500.0\n). The conversion of the parameters can be done using the functions provided in the
BuildingElementMigrationUtil
or by a custom migration implementation.
Example
Let's say with the version 2.0 we did following changes in our PythonPart:
- the parameter Minor was renamed to MinorRadius
- the parameter Major was renamed to MajorDiameter
- the value of the new parameter MajorDiameter must be doubled, as it now represents a diameter instead of radius
Here is how the migration can be implemented:
def migrate_parameter(parameter_list: List[str],
version : float):
if version < 1.9:
    return
BuildingElementMigrationUtil.\
transfer_parameter_value(parameter_list = parameter_list,
old_element_id = "",#(1)!
old_value_name = "Minor",
new_element_id = "",
new_value_name = "MinorRadius")
BuildingElementMigrationUtil.\
transfer_parameter_value(parameter_list = parameter_list,
old_element_id = "",
old_value_name = "Major",
new_element_id = "",
new_value_name = "MajorDiameter",
converter_function = lambda value: str(float(value) * 2)) #(2)!
- In case of operating with more than one BuildingElement objects (more than one .pyp file for palette and PythonPart creation), a parameter can be migrated from one BuildingElement object to another. In this case (and in 99% of other) there is only one .pyp file, so we provide an empty string here.
- As a conversion of a parameter value was necessary, conversion function must be provided as an argument.
This conversion function must be defined as
conversion_function(value: str) -> str, meaning the input as well as output value must always be a string, regardless of what type of parameter value is converted.
Constants
In some cases, it's better to use named constants instead of magic numbers inside the PYP and PY files. Syntax like RED or SET_LENGTH is much more readable than 6 or 1001.
You can define these kind of constants in the PYP file in the <Constants> section.
Define this section between <Script> and <Page> sections.
…
</Script>

<Constants>
    <Constant>
        <Name>RED</Name>
        <Value>6</Value>
        <ValueType>Integer</ValueType>
    </Constant>
</Constants>

<Page>
…
You can then access the constants in both PYP and PY files
Refer to the constants in the tags <Value>, <ValueList> and <EventId> by their name:
| Tag | Example |
|---|---|
<Value> |
<Value>GREEN</Value> |
<ValueList> |
<ValueList>LENGTH_1|LENGTH_2|LENGTH_3</ValueList> |
<EventId> |
<EventId>SET_LENGTH</EventId> |
The constants are part of the BuildingElement object and can be accessed with their names like:
Examples on GitHub
Refer to the following examples to see the full implementation of constants:
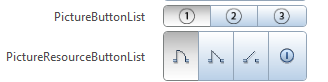
Picture resources

Controls like buttons or combo box allows you to place an icon on them. You can either use your own .png file or choose from icons available in ALLPLAN. For the latter, you will need the icon ID. Use the browser below to find what you need, Click on the icon, to copy its ID to the clipboard.
-
When your UI requirements exceeds the capabilities of PythonParts framework, you can build your own user interface. We recommend achieving it by creating a separate .NET application and loading its assemblies using pythonnet (the package is already delivered with ALLPLAN installation). Have a look on the example UsingClrInteractor. ↩